- EasyCard
- Trade
- Help
- Announcement
- Academy
- SWIFT Code
- Iban Number
- Referral
- Customer Service
- Blog
- Creator
Easy Steps to Set Up Your Shopify Store for Beginners


Image Source: unsplash
You can start an online store with Shopify, even if you have never built an ecommerce website before. Shopify makes it easy to build a shopify store from scratch. You do not need coding skills or a business license to get started. This guide will show you how to start an online store and manage your store online with simple steps. You can build an online store that looks professional and reaches customers everywhere. Shopify gives you the tools to run your store online. With this step-by-step guide, you can build a shopify store and start an online store in no time.
Key Takeaways
- Anyone can start a Shopify store easily without coding skills or a business license by following simple steps.
- Use Shopify’s free trial to explore features, add products, and customize your store before paying.
- The Shopify dashboard helps you manage sales, products, customers, and marketing all in one place.
- Choose and customize a theme that fits your brand to create a professional and user-friendly store.
- Set up payments, shipping, and taxes carefully, then test your store fully before launching to ensure smooth operation.
Start an Online Store
Starting your own online store with Shopify is easier than you might think. You do not need any experience or a business license to get started. This step-by-step guide will help you start an online store, create an account, and launch your first shop.
Create Account
To start a Shopify store, you first need to create an account. Go to the Shopify website and sign up. You will need to enter your email address, first and last name, and a password. Shopify will ask you to choose a name for your store. Pick something unique that matches your brand. You can skip the startup wizard if you want to explore on your own. After you create a store, you will land on the Shopify dashboard. Here, you can manage everything for your online store.
Tip: You do not need a business license or any special skills to start an online store with Shopify. Anyone can do it!
Free Trial
Shopify offers a free trial so you can start an online store without paying right away. The standard free trial lasts for 3 days. During this time, you can add products, select a theme, and test out free apps. Some plans let you extend the trial to 90 days for just $1 USD per month. This gives you more time to build a Shopify store, set up shipping, and test your checkout. Use the trial to explore all the features and see how Shopify can help you run your store online.
Here is a quick overview to start a Shopify store:
- Create an account on Shopify.
- Choose a store name.
- Start your free trial.
- Explore the dashboard and settings.
- Begin to build a Shopify store by adding products and choosing a theme.
You can start an online store today and see how easy it is to manage your business online. Shopify gives you all the tools you need to succeed.
Shopify Tutorial: Dashboard
When you open your Shopify dashboard for the first time, you might feel a little overwhelmed. Don’t worry. This Shopify tutorial will help you understand the main features and show you how to move around the dashboard with ease. You will see how simple it is to manage your online store, check your sales, and keep track of your products.
Main Features
The Shopify dashboard gives you a clear view of your store’s performance. You can see your sales, customer activity, and inventory all in one place. This Shopify tutorial breaks down the main features for you:
| Feature Category | What You Can Do |
|---|---|
| Overview Dashboard | See a snapshot of your store’s sales and traffic |
| Sales Reports | Check sales by product, channel, and order value |
| Customer Reports | Track new and returning customers |
| Marketing Reports | View sessions and sales from your marketing efforts |
| Behavior Reports | Analyze cart activity and popular pages |
| Inventory Reports | Monitor stock and bestsellers |
| Financial Reports | Review profits, discounts, and refunds |
| Order Reports | Manage fulfillment and returns |
| Live View | Watch real-time orders and visitors |
You can use these features to make smart decisions for your online store. The dashboard is easy to use, even if you are new to Shopify. This Shopify tutorial will help you get comfortable with each section.
Tip: Some advanced reports are only available on higher plans, but the basic dashboard covers everything you need to start.
Navigation
Learning how to move around the Shopify dashboard is key. This Shopify tutorial will guide you step by step. You will find a sidebar menu on the left. Here’s how you can use it:
- Go to “Home” for a quick look at your store’s activity and tips.
- Click “Orders” to manage customer orders, refunds, and abandoned carts.
- Select “Products” to add, edit, or organize your products.
- Visit “Customers” to see profiles and order history.
- Use “Analytics” for detailed reports on sales and traffic.
- Open “Marketing” to create and track campaigns.
- Tap “Discounts” to set up special offers.
- Explore “Apps” to add new tools for your store.
- Check “Settings” to adjust payments, shipping, and taxes.
You can also use the search bar at the top to find anything fast. If you manage more than one store, switch between them using the dropdown menu. The Shopify mobile app lets you run your store online from anywhere, though some features work best on the web.
This Shopify tutorial makes it easy to learn the dashboard. You will soon feel confident managing your online store, checking your products, and growing your business.
Choose Theme

Image Source: pexels
Picking the right theme is a big step when you set up your Shopify store. The theme controls how your store looks and feels. You want your customers to enjoy shopping and trust your brand. Shopify gives you many options, so you can create a professional-looking store that matches your style.
Browse Themes
Shopify offers a huge selection of themes. You can find both free and paid themes in the Shopify Theme Store. Here’s a quick look at the differences:
| Aspect | Free Shopify Themes | Paid Shopify Themes |
|---|---|---|
| Price | No upfront cost; may need extra apps for more features | One-time payment ($180-$350 USD); more features included |
| Design | Simple design, fewer options | More control, unique layouts, animations |
| Features | Basic features | Advanced features like mega-menus, banners |
| Performance | Good, but can slow with many apps | Optimized for speed and large stores |
| Support | Basic support | Advanced support from developers |
Shopify has 268 official themes. Only 23 are free, while 245 are paid. That means about 9% are free. You can also find over 1,500 third-party themes if you want even more choices.
When you browse themes, follow these steps:
- Think about your target customers.
- Look at your products and what you sell.
- Pick a theme that fits your brand and niche.
- Make a list of features you need, like search or fast loading.
- Read reviews to see what others say.
- Decide your budget.
- Check if you can customize the theme.
- Preview the theme before you install it.
- Install the theme in your Shopify dashboard.
Tip: You can always change your theme later if you want a new look for your store.
Customize Theme
After you pick a theme, you can make it your own. Shopify makes this easy with drag-and-drop tools and AI helpers. You do not need to know any code.
- Use the drag-and-drop editor to move sections, add images, and change layouts.
- Change fonts, colors, and styles to match your brand.
- Use AI tools like Shopify Magic to write product descriptions and headlines.
- Try AI image editors to add backgrounds or models to your product photos.
- Edit menus and navigation to help customers find what they need.
- Add videos, banners, and animations for a modern look.
- Explore the Shopify App Store for more design tools.
These tools help you build a store that stands out. You can update your design anytime as your business grows.
Add Products
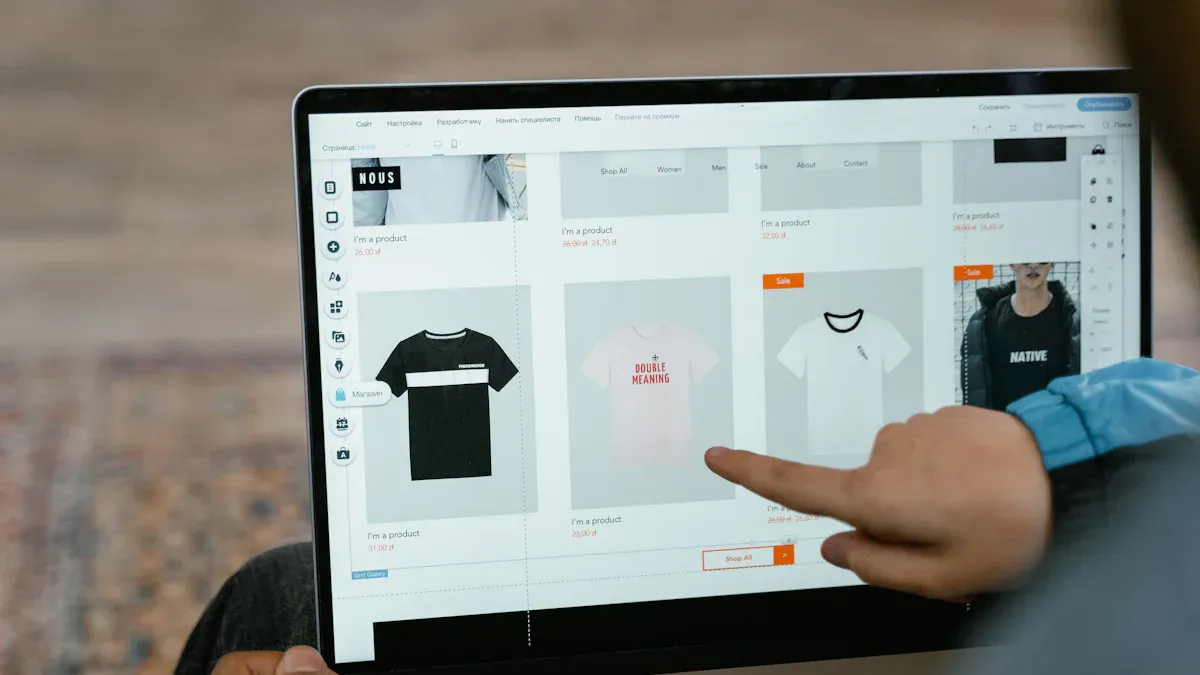
Image Source: pexels
Adding products is one of the most exciting steps when you set up your Shopify store. This is where you bring your business to life. You get to show off what you sell and help customers find what they want. Let’s walk through how you can add your products and organize them for the best shopping experience.
Product Listings
You want your products to stand out and make shopping easy for your customers. Here’s how you can add products to Shopify store and create listings that sell:
1. Log in to your Shopify dashboard and go to the “Products” section.
2. Click “Add product” to start your first listing.
3. Write a clear product title. Use keywords and your brand name if possible.
4. Add a detailed description. Tell your story, highlight features, and use bullet points for easy reading.
5. Upload high-quality images. Show your products from different angles and use lifestyle photos to help shoppers imagine using them.
6. Set your price. Be honest and show discounts if you have them.
7. Add inventory details and shipping info.
8. Optimize for search engines. Use keywords in your title, description, and image alt text.
9. Preview your product page. Make sure everything looks good on both desktop and mobile.
10. Save and publish your product so it appears in your store.
Tip: Ask your customers for reviews and display them on your product pages. Reviews help build trust and boost sales.
You should always keep your product listings fresh and up to date. Test different images, titles, and prices to see what works best.
Collections
Collections help you organize your products and make shopping easier for everyone. You can group similar items together, like “New Arrivals,” “Best Sellers,” or “On Sale.” In Shopify, you can create custom views to filter and sort your collections. This makes it simple for customers to browse and find what they need.
When you add your products to collections, you can:
- Highlight seasonal or trending items.
- Make it easier for shoppers to explore your store.
- Create special pages for events or promotions.
You can duplicate and customize collection views in your Shopify admin. Try different filters to see what works best for your store. Collections keep your store neat and help customers enjoy shopping.
Essential Pages
Every Shopify store needs a few key pages to build trust and help customers feel confident when shopping. These pages show that your business is real and that you care about your shoppers. Let’s look at the most important ones you should set up.
About Page
Your About page is where you tell your story. People want to know who they are buying from and why your store exists. Share what inspired you to start your business. Explain your mission and how you help your customers. Use friendly language and keep it personal.
- Add your brand’s story and values.
- Show photos of your team or workspace.
- Explain what makes your products special.
- Keep the layout simple and easy to read.
A good About page connects with visitors on an emotional level. It helps them trust you and feel good about shopping at your store.
Tip: Don’t try to share everything at once. Guide your visitors through your story step by step.
Contact Page
Customers want to reach you easily if they have questions. A clear Contact page shows that you are open and ready to help. Here are some features you should include:
| Feature | Why It Matters |
|---|---|
| Contact form | Lets customers send messages directly |
| Email address | Offers a quick way to get in touch |
| Phone number | Builds trust with real-time support |
| Live chat or text | Gives instant answers to simple questions |
| Customer service hours | Sets clear expectations for response times |
| FAQ or Help Center | Helps shoppers find answers on their own |
You can add a friendly welcome message at the top. Keep your form short—just ask for the basics like name, email, and message. If you have different teams, direct questions to the right place. This makes your support faster and more helpful.
Navigation Menus
Navigation menus help shoppers move around your store. Simple menus make it easy for people to find what they want. Here’s how you can set up your menus for the best experience:
- Use clear names for each menu item.
- Group similar products or pages together.
- Keep the number of links small so it’s not overwhelming.
- Use mega menus if you have lots of categories.
- Add a search bar for quick product searches.
- Make sure your menu looks good on phones and tablets.
Test your navigation often. Ask friends or family to try your store and see if they can find things easily. Good navigation helps customers stay longer and can even optimize your store for search engines.
Remember: A strong About page, Contact page, and easy navigation all work together to build trust and help your store succeed.
Set Up Payments
Getting paid is one of the most important steps when you build your Shopify store. You want to make sure customers can pay easily and safely. Shopify gives you several ways to accept payments. Let’s walk through how you can set up payments and start receiving payments in your store.
Shopify Payments
Shopify Payments is the easiest way to accept payments on your store. You do not need to use extra software or connect to outside services. You can turn it on right from your Shopify dashboard. Shopify Payments supports credit cards, Apple Pay, Google Pay, and local currencies. You also get 24/7 support and built-in financial reports. This makes it simple to track your sales and see how much you earn.
To get started, go to “Settings” in your Shopify dashboard. Click “Payments.” Choose Shopify Payments and follow the steps. You will need to enter your business details and bank account for payouts. Shopify will guide you through each step. Once you finish, your customers can use Shopify checkout to pay for their orders.
Note: If you use Shopify Payments, you avoid extra transaction fees that come with other gateways.
Other Gateways
Shopify also lets you use other payment gateways if you want more options. Some customers like to pay with PayPal, Stripe, or even international methods. You can add these gateways in the same “Payments” section of your dashboard. Just pick the provider you want and follow the setup instructions.
Here’s a quick look at some popular payment gateways for Shopify stores:
| Payment Gateway | Best For | Key Features & Pros | Cons | Pricing Summary |
|---|---|---|---|---|
| Shopify Payments | Shopify merchants | No extra software; PCI DSS compliant; local currencies; 24/7 support; integrated reporting | Only for Shopify stores; extra fees for third-party gateways | 2.4% - 2.9% + 30¢ per transaction |
| Stripe | Subscriptions | PCI DSS compliant; many countries/currencies; subscription billing; branding options | Needs technical setup; high chargeback fees | 2.9% + 30¢ per transaction; extra fees possible |
| PayPal | Global customers | Trusted brand; buyer/seller protection; one-touch checkout; many currencies | Separate setup; higher fees; support issues | Higher transaction fees than alternatives |
| Adyen | Omnichannel payments | Fixed fees; many payment methods and channels | Pricing details not always clear | N/A |
| Authorize.net | Visa merchant accounts | Secure processing; good for Visa transactions | N/A | N/A |
| WorldPay | International payments | 300+ payment methods; many currencies; strong security; 24/7 support; no monthly fee | Pricing not always clear | 0.75% - 2.75% depending on payment method |
You can mix and match gateways to fit your customers’ needs. Some shoppers trust PayPal, while others prefer credit cards. Test your payment setup before you launch your store. Make sure everything works and customers can check out without problems.
Tip: Always check your payment settings after you set up payments. This helps you avoid missed sales and keeps your store running smoothly.
Shipping & Taxes
Setting up shipping and taxes is a big step when you run a Shopify store. You want your customers to know exactly what they will pay and make sure you follow the rules. Let’s break it down so you can get started with confidence.
Shipping Rates
You need to set up shipping rates so your customers know the cost before they check out. Shopify lets you create different shipping zones and rates based on where you ship. Here’s how you can do it:
- Go to your Shopify admin and open the “Settings” menu.
- Click on “Shipping and delivery.”
- Add shipping zones for the regions you want to ship to, like the United States, Canada, or China.
- Set up shipping rates for each zone. You can choose flat rates, free shipping, or rates based on weight or order price.
- Test your checkout to make sure the rates show up correctly.
Tip: Offer free shipping for orders over a certain amount. This can encourage customers to buy more from your store.
You can also use carrier-calculated rates if you want real-time prices from companies like UPS or FedEx. This helps you charge the right amount and avoid losing money on shipping.
Tax Settings
Taxes can feel tricky, but Shopify makes it easier for you. The platform can automate most sales tax calculations, but you still need to make sure your settings match local laws. Here’s a simple way to set up tax rates and stay compliant:
- Find out if you need to collect sales tax by checking with local tax authorities or a tax professional.
- Register your business with the right agencies and get a tax number.
- In Shopify admin, go to “Settings” and then “Taxes and duties.”
- Select your country or region and enter your tax number.
- Enable tax collection for each region where you have tax obligations.
- Review and update your tax settings often to keep up with changes in the law.
Shopify supports different tax services depending on your location. You can override default rates if needed. Always double-check your rates and consult a tax expert if you’re unsure. This helps your store follow the rules and avoid problems later.
Note: Shopify can’t file your taxes for you unless you use Shopify Tax with automated filing. You must register and remit taxes yourself in most cases.
Domain Setup
Setting up a custom domain makes your store look more professional and helps customers remember your website. You can buy a new domain right from Shopify or connect one you already own from another provider. Let’s walk through both options so you can get your store online with a name you love.
Buy Domain
You can buy a custom domain directly through Shopify. This is the easiest way because Shopify handles all the setup for you. Here’s how you do it:
- Go to your Shopify admin and open Settings.
- Select Domains.
- Choose Buy new domain.
- Type in the domain name you want. Shopify will show you which names are available and their prices.
- Pick the domain you like and review the price and options, such as automatic renewal.
- Enter your payment details and check the Domain Registration Agreement.
- Complete your purchase.
- After you buy, check your email for a message from Shopify. Follow the instructions to verify your email address and finish registering your domain.
Tip: Before you buy, check if your domain comes with privacy protection and see if there are any special rules for your chosen extension. Some domains have extra requirements or higher renewal fees.
Connect Domain
If you already own a domain from another provider, you can connect it to your Shopify store. You just need to update a few settings with your domain provider. Here’s what you do:
- Log in to your domain provider’s account.
- Find the DNS settings for your domain.
- Change the A record to Shopify’s IP address: 23.227.38.65.
- Set the CNAME record for ‘www’ to shops.myshopify.com.
- Remove any other A records that might be there.
- In your Shopify admin, go to Settings > Domains.
- Choose Connect existing domain and enter your domain name.
- Shopify will check your connection. Sometimes it takes up to 48 hours for changes to take effect.
Note: You will still manage payments and renewals for your domain through your original provider, not through Shopify.
A custom domain helps your store stand out and builds trust with your customers. Take your time to pick a name that fits your brand and is easy to remember.
Test & Launch
Test Orders
Before you launch your shopify store, you need to make sure everything works. Testing helps you catch problems before your customers do. Here’s a simple way to test your store:
- Place test orders to check the checkout process, order handling, inventory, shipping, and taxes.
- Turn on test mode for Shopify Payments. Go to Settings, then Payments, and select “Use test mode.” Save your changes.
- Try both successful and failed transactions. This helps you see what your customers will experience.
- If you use other payment gateways, see if they offer test transactions. If not, place a manual test order.
- After testing, turn off test mode so you can accept real payments.
- Remove the storefront password when you are ready for the public.
Tip: Always double-check your payment, shipping, and tax settings. This step can save you from future headaches.
You should also test your store with friends or family. Ask them to find products, add them to the cart, and go through checkout. Their feedback can help you spot things you missed.
Start a Shopify Store: Launch
You have tested your shopify store and fixed any issues. Now you are ready to start a shopify store for real customers. Here’s how you can launch your shopify store with confidence:
- Remove any test products, orders, and customer data.
- Make sure all payment methods are set to live mode.
- Check that your domain points to your shopify store.
- Review your site for broken links, missing images, or typos.
- Set up your third-party apps, like email or reviews.
- Prepare your customer service team with FAQs and support info.
- Remove the storefront password so everyone can visit your store.
- Announce your launch on social media and email.
Note: After you launch your shopify store, keep an eye on orders and customer feedback. Set up surveys or feedback forms to catch any bugs or issues.
You did it! You can now welcome your first customers and start growing your business.
Avoid Mistakes
Starting your Shopify store feels exciting, but it’s easy to overlook small things that can cause big problems later. You want your launch to go smoothly. Let’s look at how you can avoid the most common mistakes when starting a shopify store.
Double-Check Details
Before you open your store to the world, take time to review the important details. Many beginners forget these steps and run into trouble. Here’s a checklist to help you:
- Enter your billing information in the Shopify dashboard. This keeps your store running after the free trial.
- Set up shipping rates that match your real costs. If you skip this, you might lose money on every order.
- Check your tax settings. Make sure they fit your business and where your customers live. You can ask an accountant for help.
- Turn on two-factor authentication. This adds extra security to your login.
- Only install the apps you really need. Too many apps can slow down your store and leave behind messy code.
- Use high-quality images and write clear product descriptions. This helps customers trust your store.
- Optimize your store for search engines. Pick a unique name, use keywords, and add SEO-friendly titles.
- Submit your sitemap to search engines. Tools like Search Console can help you track your site’s performance.
Tip: Always test your checkout, payments, and shipping before you launch. Ask a friend to try your store and give feedback.
Keep It Simple
You don’t need to make your store complicated to succeed. Shopify’s easy-to-use design helps you get started fast. Here’s why keeping things simple works best:
- The user-friendly dashboard means you don’t need technical skills.
- You can set up a working store in less than an hour.
- Free themes and apps make it easy to customize your store.
- Simple navigation helps customers find what they want.
- Flexible payment options let you grow at your own pace.
Focus on the basics first. Add more features as your business grows. A simple setup helps you avoid stress and makes your store easier to manage.
You can start your Shopify store today and see how simple it is to grow your business. Shopify gives you user-friendly tools, step-by-step tutorials, and 24/7 support. If you want to learn more, check out these resources:
- Shopify Academy for free courses
- Video tutorials on the Help Center and YouTube
- Forums and expert networks for extra help
Take the first step now. With the right tutorial, you can attract more traffic and sales to your store.
FAQ
How much does it cost to start a Shopify store?
Shopify plans start at $39 USD per month. You can try the free trial first. Paid themes and apps may add extra costs. You pay transaction fees unless you use Shopify Payments.
Do I need a business license to open a Shopify store?
You do not need a business license to start. Shopify lets you set up your store and sell products right away. Some countries, like China, may require a license later as your business grows.
Can I sell to customers outside my country?
Yes, you can sell worldwide. Shopify supports many currencies and languages. You can set up shipping zones for places like the United States, China, and Europe. Make sure you check local tax rules.
How do I get paid from my Shopify store?
You can use Shopify Payments or other gateways like PayPal. Shopify sends your earnings to your bank account, such as a Hong Kong bank account. Payout times depend on your payment provider, usually 2–5 business days.
Running a Shopify store means handling payments from customers worldwide, but high fees and payment barriers can slow you down. BiyaPay’s EasyCard solves this with seamless transactions across 190+ countries and no annual fee, perfect for global sales. Supporting real-time conversion of 30+ fiat currencies and 200+ cryptocurrencies, it ensures transparent exchange rates and fees as low as 0.5%, saving you money compared to traditional gateways. Whether paying suppliers on eBay or accepting payments via PayPal, EasyCard simplifies your financial operations. Setting up takes minutes, letting you focus on growing your store. With secure, compliant transactions, BiyaPay empowers Shopify merchants to thrive globally. Ready to streamline your payments? Sign up for BiyaPay now and boost your store’s global reach!
*This article is provided for general information purposes and does not constitute legal, tax or other professional advice from BiyaPay or its subsidiaries and its affiliates, and it is not intended as a substitute for obtaining advice from a financial advisor or any other professional.
We make no representations, warranties or warranties, express or implied, as to the accuracy, completeness or timeliness of the contents of this publication.


Contact Us
Company and Team
BiyaPay Products
Customer Services


is a broker-dealer registered with the U.S. Securities and Exchange Commission (SEC) (No.: 802-127417), member of the Financial Industry Regulatory Authority (FINRA) (CRD: 325027), member of the Securities Investor Protection Corporation (SIPC), and regulated by FINRA and SEC.
registered with the US Financial Crimes Enforcement Network (FinCEN), as a Money Services Business (MSB), registration number: 31000218637349, and regulated by FinCEN.
registered as Financial Service Provider (FSP number: FSP1007221) in New Zealand, and is a member of the Financial Dispute Resolution Scheme, a New Zealand independent dispute resolution service provider.